Follow these steps to install the Addon:
- Go to https://prometheus.atlas-sys.com/display/ILLiadAddons/ILLiad+ExLibris+Alma+Primo+Addon and download the zip file.
- Unzip the downloaded files and place them in C:/Program FIles (x86)/ILLiad/Addons/ExLibris Alma Primo folder.

- Open the ILLiad Client application.
- Click on the System tab.
- Click the Manage Addons button.
-
Click on the addon that has the name ExLibris_Alma_Primo and select the check box under the Active column to activate this Addon in the client.
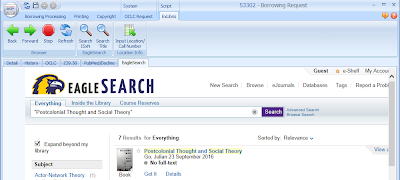
- In the lower-right part of the window you will need to check the checkbox that says AutoSearch. Do not check StartwithISxN or Popup. For your localurl the directions say to enter in the shortened URL. I started out by entering https://tntec-primo.hosted.exlibrisgroup.com, but this didn't work (I got an error message when using the Addon). So then I entered in the full URL of our Primo new UI https://tntec-primo.hosted.exlibrisgroup.com/primo-explore/search?vid=01TNTECH_default and although I didn't get an error message, the title didn't automatically populate in the search. So then I tried our classic UI longer URL http://tntec-primo.hosted.exlibrisgroup.com/primo_library/libweb/action/search.do?vid=01TNTECH_default and it works perfectly! Last, you will need to enter in some text in the AddonRibbonName box. I named mine EagleSearch because this is what we branded our Primo.
- Click the Save Settings button.
- Close the Manage Addons window.
- I am not sure if you have to but I completely closed out the client and opened it back up.
- Now, to test you will need to open the Client. On the Home tab, in the Main - Borrowing tab, you will need to double click on Awaiting Request Processing. Hopefully you have at least one request so that you can test.
- Double click on one of the borrowing requests.
- Click on the tab that you just created. Mine is called EagleSearch. The Addon should automatically search for the title.


Troubleshooting
If you are unable to save your Addon settings, then you will need to follow the directions in my next post on Word and Windows Permissions Requirements for ILLiad.
No comments:
Post a Comment