Friday, August 11, 2017

Using CCC Get It Now with Alma/Primo

Note:  TTU calls Primo "EagleSearch" and so you will see me use the terms interchangably.

TTU's History with Get It Now

In 2012 TTU made the decision to use CCC's Get It Now service to purchase individual articles for Faculty and Graduate Students at the time that they want them (on demand).  At that time we had ProQuest Summon and 360 Link.  Unfortunately, 360 Link did not work with Get It Now and so we switched to ExLibris SFX link resolver.  We "turned on" all possible Get It Now collections in SFX.  When a user wanted an article that we didn't have full text, they would see two options - InterLibrary Loan and Get It Now.  If they chose Get It Now, then the article would be sent directly to them via email.  We implemented the unmediated version.
In 2016 TTU purchased Alma and Primo.  Alma/Primo handles Get It Now differently.  All Get It Now collections are considered full text services like databases that we subscribe to instead of like a document delivery option.

How I First Implemented Get It Now with Alma/Primo

TTU library wanted to:

  • Activate all 110 Get It Now collections in Alma
  • Only allow faculty & graduate students to use Get It Now
  • Make Get It Now article links available without loggin in
  • All Get It Now requests would be unmediated - articles would be sent directly to the user without the need of library staff to do anything
Unfortuantely, this is impossible.  You can't restrict Get It Now by specific Alma User Groups unless you require logging in.  So, in July 2016 we allowed everyone to see (and use) the links, but we named the link "Faculty & Graduate Students ONLY - Get It Now ($25 charge to library - see notes below)" and then we had notes in red that said the following in red text:
Faculty & graduate students should use the InterLibrary Loan (ILL) link below when possible to save the library $25 per article.
Undergraduates can ONLY use the ILL link below.
To see the ILL link you must be signed in to EagleSearch

Our users REALLY started using the Get It Now links and even though we said undergraduates couldn't use the service, they still did.  Get It Now said that they could determine if an email address is a student and not allow them to log in to the service, but then this would eliminate graduate students as well.  About 40% of the article requests ended up being undergraduate students and it got so expensive that we had to deactivate all 110 Get It Now collections in Alma in October 2016.

Our Current Implementation of Get It Now with Alma/Primo

In June 2017 we had some faculty users say that they really need the library to turn Get It Now back on.  But we didn't want a repeat of what had happened in the Fall.  So the coordinators of the library decided we should implement Get It Now as follows:
  • Activate all 110 Get It Now collections in Alma
  • Only allow faculty & graduate students to use Get It Now
  • Make Get It Now article links available only after without logging in (so that we could enforce only Faculty to use Get It Now)
  • All Get It Now requests would be unmediated - articles would be sent directly to the user without the need of library staff to do anything
Unfortunately, this too was impossible.  I was able to only allow our Faculty user group to see the Get It Now Links after logging in, but I couldn't create an Alma Display Logic Rule that would hide these links from guests (before logging in)!!  I opened a sales force case and ExLibris confirmed that the display logic rules can only be applied after users have logged in.  This means that anyone could see the links.  I did contact Get It Now and set it up to where only Faculty could make requests but we don't want students/grad students to see the links and then not be able to use them (confusing & not user friendly).

So, we decided to change to this set-up:
  • Create a General Electronic Service (GES) for each participating publisher of Get It Now.  Set the service to only be available after logging in. (this will only allow users to see the Get It Now links after logging in)
  • Create a display logic rule for each GES created (above) that says to hide this GES from all users except for TTU Faculty/Staff/Admin. (this will only allow TTU Faculty/Staff/Admin to see & use the Get It Now links)
  • All Get It Now links are now implemented like a document delivery service where they only show up if we do not already have the full text and the link appears along with the InterLibrary Loan link.
  • We changed to the mediated version of Get It Now so that now when the user clicks on the link it takes them to ILLiad to make the request.  Then our ILL department makes the request for them.  We really don't like this but this is the only way to do it through General Electronic Services in Alma.
The General Electronic Services were very time-consuming to create.  Here is a link to the spreadsheet I created to keep up with what rules I had to create for each publisher:  https://erdb.tntech.edu/docs/Get It Now General Electronic Services Set-Up.pdf

How to Download a List of Portfolios from Alma Electronic Collection

Also, something that was useful for me that I learned is how to download a list of portfolios from an Alma community zone electronic collection.  
  1. Using the Repository Search, search for an electronic collection in the community zone. (I use "Electronic collection Name" in the where drop down and I usually like to change Sort by to Collection name - Asc)
  2. Click on the link that says Portfolio List (###) where ### is the actual number of portfolios.
  3. In the top(ish) right of the screen click on Tools
  4. Choose Extended Export and the excel spreadsheet will be downloaded to your computer.
For this project, I was particularly interested in the ISSN & the Publisher columns.

Wednesday, August 2, 2017

Databases in Primo Central Index

Primo Central Indexing Collection Lists


 How to Navigate to YOUR Primo Central Index List of Databases

The Primo Back Office is extremely difficult to navigate - especially if you are trying to select or deselect databases from the Primo Central Index.   Below are the steps to take to navigate to the databases to select/deselect:

  1. Log in to Primo Back Office
  2. Click on Ongoing Configuration Wizards near the bottom of the screen
  3. Click on Institution Wizard
  4. For TTU's Primo, we have a Primo Institution Name of "Tennessee Technological University" - on this line click on the Edit button.
  5. On the right side of the screen are three blue buttons.  Click on the button that says My Profile (this opens in a new tab)
  6. Click on My Client Applications 
  7. The Client Applications screen has several blue links.  Click on the blue link in all caps that is named PRIMO
  8. At the very bottom of the screen click on Edit client resource collections
You are there!  Usually this last screen takes a few seconds to load.  


 Which Databases Should I Select

Definitely you should select all the databases that your library subscribes to so that the metadata for those databases will be included in the index.  At TTU, we want our users to be able to search all content (whether we have it or not) and then allow them to use InterLibrary Loan or Get It Now (posting about this later on) for materials that we do not have.  In fact, our default search from the library home page has "Expand Beyond My Library" checked already.  So, we also select all databases that are not restricted.  Some databases require subscription for searching and so we do not select these because they will end up in bad links for our users.


 Notification of New Content Added to Primo Central Index

ExLibris sends out an email "Primo Central Index: New Collections Update" regularly that contains a list of new content added to the index and content that will be removed.  This is the only way I know of to be notified of these changes.  Only one email address per Primo is allowed to receive the update email.  To View or Change this email address do the following:

  1. Log in to Primo Back Office
  2. Click on Ongoing Configuration Wizards near the bottom of the screen
  3. Click on Institution Wizard
  4. For TTU's Primo, we have a Primo Institution Name of "Tennessee Technological University" - on this line click on the Edit button.
  5. On the right side of the screen are three blue buttons.  Click on the button that says My Profile (this opens in a new tab)
  6. Click on Customer Details
  7. At the bottom is the Primo Central Main Contact.  You can then click on Edit Main Contact if you want to change the contact information/email.


Thursday, July 27, 2017

Photoshop Pop-Up Window Disappears Off Screen

If you have multiple monitors and you work with photoshop, you will notice that sometimes when you click an icon, the pop up box opens up where you can't see it...off your screen.  I found a great video that demonstrates how to get that pop-up back on the screen!

https://www.youtube.com/watch?v=iMt68khvd_4

Friday, July 21, 2017

Using the Pen Tool In Photoshop to Draw a Clean Dashed Curvy Line

Wait...there's a pen tool in Photoshop?  Which icon is that?


This video on YouTube shows how to draw a dashed line in Photoshop: https://www.youtube.com/watch?v=rr5WTYShltI

I have Photoshop CS6 and the directions worked.  I'm really not good, yet, at using the pen tool but it is the best way that I (now) know to draw a curvy line that doesn't look like a 1-year-old drew it.

Here is the image I used it on today for the library website:


P.S. I had to look up if "drew" is the correct past tense of "draw" because it didn't sound right in my head.  Turns out that it is correct.  https://www.quora.com/Which-is-the-correct-past-tense-of-draw-drew-or-drawn-and-why


Thursday, July 20, 2017

Add Google Analytics to OJS (Smarty Templates)

The Open Journal Systems (OJS) https://openjournalsystems.com/ is constructed with Smarty Templates https://www.smarty.net/.

Google Analytics instructs you to paste the tracking script directly before the </head> tag.  The </head> tag for ALL OJS pages is located in the ojs/lib/pkp/templates/common/header.tpl page.

So I tried this and it didn't work.  This is because the Smarty tempalte engine attempts to translate and interpret some keywords in Google Analytics script that conflicts with the Smarty template delimiter syntax.

The fix is to put {literal} and {/literal} tags around your block of code, which allows it to be taken literally.

So, this is what it looks like:
{literal}
     <script>
       (function(i,s,o,g,r,a,m){i['GoogleAnalyticsObject']=r;i[r]=i[r]||function(){
       (i[r].q=i[r].q||[]).push(arguments)},i[r].l=1*new Date();a=s.createElement(o),
       m=s.getElementsByTagName(o)[0];a.async=1;a.src=g;m.parentNode.insertBefore(a,m)
       })(window,document,'script','https://www.google-analytics.com/analytics.js','ga');

       ga('create', 'XXXXXXX', 'auto');

       ga('send', 'pageview');

     </script>

{/literal}

Obviously you would want to replace the XXXXXXX with your actual google analytics tracking code.  😁

Word and Windows Permissions Requirements for ILLiad

If you ever can't do something in ILLiad (permissions error) - it may be because you do not have the right settings for MS Office Word or Windows.


To enable the ILLiad template macros, check these settings in MS Office Word:
  1. Open MS Office Word.
  2. Select "Options" located towards the bottom of the left-hand menu
  3. Select "Trust Center" located at the bottom of the left-hand menu
  4. Select "Trust Center Settings" located at the bottom far right.
  5. Select Macro Settings on the left side.
  6. Then click on the "Enable Macros" bottom.
  7. Choose OK.
  8. Choose OK again.
To disable the "enable printing" and "enable editing" macros in MS Office Word:

  1. In Microsoft Word (or Excel), select the "File" tab located at the top left-hand side
  2. Select "Options" located towards the bottom of the left-hand menu
  3. Select "Trust Center" located at the bottom of the left-hand menu
  4. Select "Trust Center Setting" located at the bottom far right
  5. Select "Protected View" located at the bottom of the left-hand menu
  6. Uncheck the following three option located under "Protected View.
    -   Enable Protected View for files originating from the Internet
    -   Enable Protected View for files located in potentially unsafe locations
    -   Enable Protected View for Outlook attachments 
  7. Select OK
  8. Select OK again

Also, when you are using Office 2013, and above, you need to do this:

Word 2013 has a new feature call reading view, and it uses this view for any uneditable files. Word will open the template documents as "Read Only,"  Word initially displays the document in this view which has the unfortunate side effect of disabling mail merge operations. To work around the issue:
  1. Open the options in Word
  2. On the General tab, there is a section for Startup options which includes a setting with "Open e-mail attachments and other uneditable files in reading view."  Make sure that is unchecked, and it will correct the issue.
  3. Save the changes and close Microsoft Word.

Windows Permissions you need:

If you are using Windows 7, 64-bit, it is at c:\program files (x86)\illiad\ by default.  Any other previous version of Windows, it will be at c:\program files\illiad\ by default.  For you to access your directory correctly, you need to make sure your permissions are correct.  
                           
With Windows 7 x 64, you need to add Permissions for each user's Windows logon to the security settings for the ILLiad folder in the c:\program files (x86)\illiad\.  With Windows 7 x 32, you work with the c:\program files\ILLiad\ folder.
  1. First, you right-click on the ILLiad folder and choose properties.
  2. Go to the Security tab and in the top section, choose Edit so you can edit the Users group 
  3. Select the Users group and below mark the full permissions.
  4. Once you click OK, then you will be back to the Main ILLiad Permissions Window.
  5. Choose Ok to get out of the window.


Search Primo from ILLiad using Addon

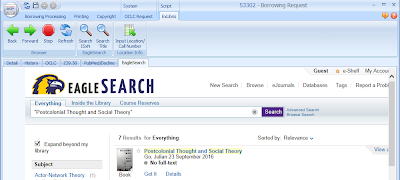
If you want to be able to search Primo in the ILLiad client when processing a borrowing request, then you will need to install the Atlas ILLiad ExLibris Alma Primo Addon.  Note that this addon works only with the classic user interface for Primo, not the new UI (as of 7/20/2017).  TTU currently uses the new UI, but for this purpose we use the old UI.

Follow these steps to install the Addon:


  1. Go to https://prometheus.atlas-sys.com/display/ILLiadAddons/ILLiad+ExLibris+Alma+Primo+Addon and download the zip file.
  2. Unzip the downloaded files and place them in C:/Program FIles (x86)/ILLiad/Addons/ExLibris Alma Primo folder.
  3. Open the ILLiad Client application.
  4. Click on the System tab.
  5. Click the Manage Addons button.
  6. Click on the addon that has the name ExLibris_Alma_Primo and select the check box under the Active column to activate this Addon in the client.
  7. In the lower-right part of the window you will need to check the checkbox that says AutoSearch.  Do not check StartwithISxN or Popup.  For your localurl the directions say to enter in the shortened URL.  I started out by entering https://tntec-primo.hosted.exlibrisgroup.com, but this didn't work (I got an error message when using the Addon).  So then I entered in the full URL of our Primo new UI https://tntec-primo.hosted.exlibrisgroup.com/primo-explore/search?vid=01TNTECH_default and although I didn't get an error message, the title didn't automatically populate in the search.  So then I tried our classic UI longer URL http://tntec-primo.hosted.exlibrisgroup.com/primo_library/libweb/action/search.do?vid=01TNTECH_default and it works perfectly!  Last, you will need to enter in some text in the AddonRibbonName box.  I named mine EagleSearch because this is what we branded our Primo.
  8. Click the Save Settings button.
  9. Close the Manage Addons window.
  10. I am not sure if you have to but I completely closed out the client and opened it back up.
  11. Now, to test you will need to open the Client.  On the Home tab, in the Main - Borrowing tab, you will need to double click on Awaiting Request Processing.  Hopefully you have at least one request so that you can test.
  12. Double click on one of the borrowing requests.
  13. Click on the tab that you just created.  Mine is called EagleSearch.  The Addon should automatically search for the title.

Troubleshooting

If you are unable to save your Addon settings, then you will need to follow the directions in my next post on Word and Windows Permissions Requirements for ILLiad. 

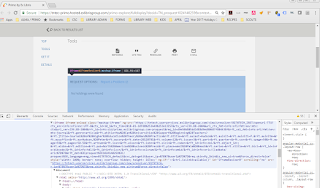
Get the OpenURL of an Item in Primo New UI

I needed to view the OpenURL of an item in Primo New UI so that I could troubleshoot why one of our Alma General Electronic Services (ILLiad...